
|
K's Cabled Warmers Winter Accessory Set 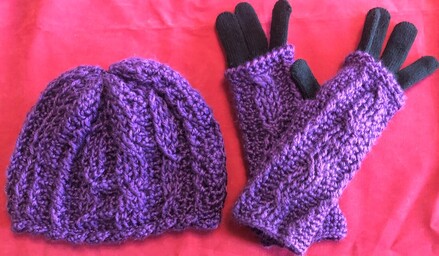 Growing up in the cold regions of northern Ontario, Canada I always seen many, many knitted items with classic cable work and I always loved the look. However, after a less than enthusiastic attempt at learning to knit when very young I turned to my passion of crochet and soon discovered that there were many ways to achieve that textured looked I loved with yarn and a crochet hook! By using a variety of stitches in multiple combinations you can produce many wonderful cabled textures and this hat and wrister set is just one example of my designing with cables! I am so very excited to share with you all here my “Cabled Warmers” as my contribution to this week’s Furls Blog. Kay  Supplies: Yarn: Furls Wander Acrylic Yarn 4 skeins in Amethyst or colour of choice https://furlscrochet.com/products/acrylic-crochet-yarn?utm_campaign=wanderyarn&utm_source=crochetwithkay-crochetclasses&crochetspecialprograms&utm_medium=affiliate#oid=1246 Designer Note: This yarn produces such an incredibly soft fabric that it is a pure pleasure to wear, and the stitch definition is wonderful making it perfect for cable and textured work  Crochet Hook: Furls Candy Shop 5.5 mm https://furlscrochet.com/products/candy-shop-crochet-hooks?utm_campaign=candyshophooks&utm_source=crochetwithkay-crochetclasses%26crochetspecialprograms&utm_medium=affiliate#oid=1246 Designer Note: These are my favorite hooks to crochet with and my hands never get tired or sore if I forget what time it is when I’m doing “just one more row”!  Other: stainless steel yarn needle (Ps: if you are like me and always are misplacing your yarn needles try on of these wonderful Furls needle cases -they are the most perfect way to always know exactly where your yarn needles are when you need them ) https://furlscrochet.com/products/needle-case-handmade-wooden-needle-holder?utm_campaign=needlecase&utm_source=crochetwithkay-crochetclasses%26crochetspecialprograms&utm_medium=affiliate#oid=1246 Abbreviations: Beg = begin(ning)s; ch = chain; sc = single crochet; Sl st= slip stitch; sp(s)= space(s) FPdc = front post double crochet; Fsc= foundation single crochet; hk = hook FPtc = front post triple crochet; RS = right side; WS = wrong side; st(s) = stitch(s) FPhdc = front post half double crochet; sk = skip; Rsc = Reverse single crochet Gauge Note: I tend to be a “loose” crocheter and have been all 50+ years of my crocheting life, so my gauge may be a little different from yours when following the pattern. I suggest simply changing your hook size to obtain the best gauge for you! Gauge: Using a 5.5 mm Furls Candy Shop hook – 20 sc across & 20 rows = 4” X 4” Designer Note: It is recommended that you read through entire pattern and notes before commencing your project(s) to ensure you have all necessary information for a success stitching adventure!  Pattern: (US terminology) Special Stitches: Front post double crochet (fpdc): To make a front post double crochet, yo, insert the hook from the front of the post, around the back and out the front again of indicated stitch one rnd/row below one you are working on. Yo again with the working yarn and carefully pull the yarn around the post so that you have three loops on your hook. Now complete the dc as normal: yo, pull through two loops on the hook, yo and pull through the last two loops on the hook. Front post half double crochet (fphdc): ( work same as above except use a hdc) To make a front post half double crochet, yo, insert the hook from the front of the post, around the back and out the front again of indicated stitch one rnd/row below one you are working on Yo again with the working yarn and carefully pull the yarn around the post so that you have three loops on your hook. Now complete the hdc as normal: yo, pull through all three loops on the hook. Front post Triple crochet (fptc): ( work same as above except use a tc) To make a front post triple crochet, yo twice, insert the hook from the front of the post, around the back and out the front again of indicated stitch one rnd/row below one you are working on Yo again with the working yarn and carefully pull the yarn around the post so that you have four loops on your hook. Now complete the tc as normal: yo, pull through two loops on the hook twice, yo and pull through the last two loops on the hook. Foundation single crochet (fsc): Step 1 – begin: Ch 2. Step 2 – make first foundation chain: Insert hook in 2nd ch from hook, yarn over and draw up a loop. This loop serves as the chain of the foundation stitch. Step 3 – make the single crochet: Yarn over and draw through 1 loop on hook (2 loops on hook), yarn over and draw through both loops on hook to complete the single crochet. Step 4 – make next foundation chain: Insert hook in chain of previous foundation stitch, yarn over and draw up a loop. Note The foundation chain is at the base of foundation stitch, insert the hook under two strands at the base. Reverse Single Crochet (rsc): Ch 1, working from left to right, sk first st, insert hook from front to back in next st to the right (A), yo, pull lp through st (B), yo, pull through 2 lps on hook . Cable Patterns: 2-Stitch Dc Cable- Skip next st. Fpdc in next stitch one row/rnd below one you are currently working on. Working in front of st just made go back and fpdc in skipped st. Remember to not use/skip the stitches behind cable work when starting next stitch. 3-Stitch Dc Cable – Row /Rnd 1: Fpdc dc in next 3 indicated sts of rd one row/rnd below one you are currently working on Row /Rnd 2: Fpdc in next 3 indicated sts of rd one row/rnd below. Row /Rnd 3: Fpdc in next three indicated sts of rnd one row/rnd below. Row /Rnd 4: Fpdc in next three indicated sts of rnd one row/rnd below Row /Rnd 5: Sk next 2 fpdc. Fptc in next st rnd one row/rnd below. Working in behind fptc just made, FPdc in each of the 2 sk sts starting with first sk st . 4 Stitch Dc Cable- Row /Rnd 1: Fpdc in next 3 indicated sts of rnd one row/rnd below one you are currently working on Row /Rnd 2: Fpdc in next 3 indicated sts of rnd one row/rnd below Row /Rnd 3: Fpdc in next 3 indicated sts of rnd one row/rnd below Row /Rnd 4: Fpdc dc in next 3 indicated sts of rnd one row/rnd below Row /Rnd 5: Sk next 2 fpdc. Fptc in next 2 sts rnd one row/rnd below . Working in front of FPtcs just made, FPptc in each of the 2 sk sts starting with first sk st . Rolled Cable Stitch - Row /Rnd 1: Ch 1, sc in same st . * Ch 3. Sk next 2 stitches, sc in next. Turn work. Work a sc in each ch st of the ch 3 you just made. Sl to first sc. (One cable made) Turn work. Working behind the cable you just made, sc in each of the sk sts.(2 sc behind cable) Skip the next sc ( the one you made after the ch 3) Sc in next st* Repeat from * to * around ending with a sc in last st or row. If working in the rnd - sl st to first sc Row /Rnd 2: Note- In this row you work a sc in the 1st and last st with 3 sc evenly spaced behind each cable (on ws of fabric). The 3 scs behind the cable are worked in the sc that were worked in the 2 skipped sts. Make sc in first st and 2 sc in the second st. Push the cable forward -towards right side of fabric - so it is out of the way, and you can see your stiches more clearly. -Ch 1. *Sc in 1st sc. *Sc in 1st st behind cable , 2 sc in next st. Repeat from* around. Sl st to beginning sc if working in round Fasten off. Weave in all ends A printable 24 page PDF copy of the complete Cabled Warmers Set (hat, wristers & button cowl or scarf )which includes pictures, charts and additional hint, tips and help is available to purchase for a small fee on this website under Patterns.  K's Cabled Warmers Hat: Leaving a good 6–8-inch tail - Fsc 62 Designer Note: I always was (and still am) frustrated by how often my beginning chain would somehow get twisted no matter how careful I was when attaching together to make a circle, so I developed this “cheat.” Row 1- Ch 1 and sc across. Turn Stitch count: 62 sc Row 2- (RS) Ch 1 and sc across. Turn. Mark as right-side Stitch count: 62 sc Row 3- (WS) Ch 2. Hdc in each st across. Stitch count: 62 hdc Remove hook leaving a clear extra-large loop in last stitch or use a stitch marker to secure last loop . Lay your crochet strip flat on table with wrong side up. Bring ends together making sure that there is no twisting, and that the top and bottom edges meet. Insert hook back into final loop and slip stitch to first st forming a circle . Remove hook leaving a good loop. Place stitch marker in loop. Now taking your yarn needle and the beginning tail you left, attach the bottom beginning stitches of each end neatly darning together to form a nice (untwisted) circle! Designer Notes: Hat circumference- Pattern will fit an average sized adult head circumference. Rnd 4: Ch 2, hdc in same st. *[Fpdc around next st, hdc in next st] 3 times. Hdc in next st. Work 2-Stitch Dc Cable Stitch. Hdc in each of next 2 sts. Work 3-Stitch Dc Cable Row 3. Hdc in each of next 2 sts. Work 4-Stitch Dc Cable Row 1. Hdc in each of next 2 sts. Work 3-Stitch Dc Cable Row 3. Hdc in each of next 2. Work 2-Stitch Dc Cable stitch. * Hdc in each of next 2 sts. Repeat from * to *once more. Hdc in last st. Sl st to first hdc. Rnd 5: RS (and all following odd numbered rounds ): Ch 1, hdc in same st. Hdc in each st around. Sl st to 1st hdc. Stitch count: 62 hdc Rnd 6: Ch 2, hdc in same st. *[Fpdc around next st, hdc in next st] 3 times. Hdc in next st. Work 2-Stitch Dc Cable Stitch. Hdc in each of next 2 sts. Work 3-Stitch Dc Cable Row 4. Hdc in each of next 2 sts. Work 4-Stitch Dc Cable Row 2. Hdc in each of next 2 sts. Work 3-Stitch Dc Cable Row 4. Hdc in each of next 2. Work 2-Stitch Dc Cable stitch. * Hdc in each of next 2 sts. Repeat from * to *once more. Hdc in last st. Sl st to first hdc. Rnd 7:- repeat Rnd 5 Rnd 8: Ch 2, hdc in same st. *[Fpdc around next st, hdc in next st] 3 times. Hdc in next st. Work 2-Stitch Dc Cable Stitch. Hdc in each of next 2 sts. Work 3-Stitch Dc Cable Row 5. Hdc in each of next 2 sts. Work 4-Stitch Dc Cable Row 3. Hdc in each of next 2 sts. Work 3-Stitch Dc Cable Row 5. Hdc in each of next 2. Work 2-Stitch Dc Cable stitch. * Hdc in each of next 2 sts. Repeat from * to *once more. Hdc in last st. Sl st to first hdc. Rnd 9: repeat Rnd 5 Rnd 10: Ch 2, hdc in same st. *[Fpdc around next st, hdc in next st] 3 times. Hdc in next st. Work 2-Stitch Dc Cable Stitch. Hdc in each of next 2 sts. Work 3-Stitch Dc Cable Row 1. Hdc in each of next 2 sts. Work 4-Stitch Dc Cable Row 4. Hdc in each of next 2 sts. Work 3-Stitch Dc Cable Row 1. Hdc in each of next 2. Work 2-Stitch Dc Cable stitch. * Hdc in each of next 2 sts. Repeat from * to *once more. Hdc in last st. Sl st to first hdc. Rnd 11- repeat Rnd 5 Rnd 12- Ch 2, hdc in same st. *[Fpdc around next st, hdc in next st] 3 times. Hdc in next st. Work 2-Stitch Dc Cable Stitch. Hdc in each of next 2 sts. Work 3-Stitch Dc Cable Row 2. Hdc in each of next 2 sts. Work 4-Stitch Dc Cable Row 5. Hdc in each of next 2 sts. Work 3-Stitch Dc Cable Row 2. Hdc in each of next 2. Work 2-Stitch Dc Cable stitch. * Hdc in each of next 2 sts. Repeat from * to *once more. Hdc in last st. Sl st to first hdc. Rnd 13: repeat Rnd 5 Rnd 14: Ch 2, hdc in same st. *[Fpdc around next st, hdc in next st] 3 times. Hdc in next st. Work 2-Stitch Dc Cable Stitch. Hdc in each of next 2 sts. Work 3-Stitch Dc Cable Row 3. Hdc in each of next 2 sts. Work 4-Stitch Dc Cable Row 1. Hdc in each of next 2 sts. Work 3-Stitch Dc Cable Row 3. Hdc in each of next 2. Work 2-Stitch Dc Cable stitch. * Hdc in each of next 2 sts. Repeat from * to *once more. Hdc in last st. Sl st to first hdc. Rnd 15: repeat Rnd 5 Rnd 16- 25: Repeat Rnds 4- 15 one more time DO NOT fasten off yarn Finishing: Assembly Turn hat inside out – wrong side facing you. Using yarn darning needle and long strand of matching yarn, weave yarn through stitches on outside of beginning FSC row making sure stitches not showing on right side of work Gently pull yarn and gather top edge together as tightly as possible leaving no open space at top of hat. Knot yarns together tightly. Do not cut remaining yarn ends at this time. Flip to right side. Finishing: Brim Edge Working on right side of hat Rnd 1: Ch sc in first 29 sts. Sc two together. Sc in each remain st. St Count: 61 sc Rnd 2: Work Row 1 of Rolled Cable Stitch Row 3: Work Row 2 of Rolled Cable Stitch Using yarn ends left on inside at top of your hat, you can add a fur pompom to your hat! A printable 24 page PDF copy of the complete Cabled Warmers Set (hat, wristers & button cowl or scarf )which includes pictures, charts and additional hint, tips and help is available to purchase for a small fee on this website under Patterns. 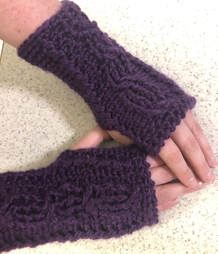 K's Cabled Warmers Wristers These wristers aka-texting gloves or wrist warmers - can be made as short or as long you wish as I designed the pattern to start at the fingertips and work up the hand and arm from there! Personally, I always make mine long enough to fit under the cuffs of my jacket for those really cold winter days! They also can be used with an additional set of gloves under them for even more warmth! Special Stitches: 2-Stitch Hdc Cable- Skip next st. Fphdc in next stitch one row/rnd below. Working in front of st just made go back and fphdc in skipped st. Remember to not use/skip the stitches behind cable work when starting next stitch. 4 Stitch Dc Cable- Row /Rnd 1: Fphdc in next 3 indicated sts of rnd one rnd below current. Row /Rnd 2: Fphdc in next 3 indicated sts of rnd one rnd below current. Row /Rnd 3: Fphdc in next 3 indicated sts of rnd one rnd below current. Row /Rnd 4: Sk next 2 fphdc one row/rnd below. Fpdc in next 2 sts . Working in front of FPdcs just made, FPdc in each of the 2 sk sts starting with first sk st . Reverse Single Crochet (rsc): Ch 1, working from left to right, sk first st, insert hook from front to back in next st to the right (A), yo, pull lp through st (B), yo, pull through 2 lps on hook . Single Crochet 2 Together (Sc 2tog): Insert hook in indicated stitch, yarn over and pull up loop (2 loops on hook ). Insert hook in next stitch, yarn over and pull up loop (3 loops on hook), yarn over and draw through all 3 loops on hook. 1 stitch decreased. Pattern Instructions: Leaving a good 6–8-inch tail - Fsc 22 Row 1- Ch 1 and sc across. Turn Stitch count: 22 sc Row 2- Ch 1 and sc across. Turn. Mark as right-side Stitch count: 22 sc Row 3- Ch 1 and sc across. Turn. Mark as right-side Stitch count: 22 sc Use the same instruction as per hat above to now join your strip into a nice, neat circle making sure it is not twisted From this point on you will be working in joined rnds on right side of fabric only. Rnd 4 (RS): Ch 1, sc in same st and in next 5 sts. Working in Rnd below current rnd, work 2-Stitch HDC Cable Stitch. Sc in next st on current rnd. Working in row below, work 4-Stitch HDC Cable Row 4 . Sc in next st of current rnd. Work 2-Stitch Hdc Cable stitch in rnd below . Sc in each of next 6 sts. Sl st to first sc. Rnd 5:(and all following odd numbered rounds) Ch 1, sc in same st and each st around. Sl st to 1st sc. Stitch count: 22 sc Rnd 6: Ch 1, sc in same st and in next 5 sts. Working in Rnd below current rnd, work 2-Stitch HDC Cable Stitch. Sc in next st on current rnd. Working in row below, work 4-Stitch HDC Cable Row 1 . Sc in next st of current rnd. Work 2-Stitch Hdc Cable stitch in rnd below . Sc in each of next 6 sts. Sl st to first sc Rnd 7: Repeat Rnd 5 Stitch count: 22 sc Rnd 8: Ch 1, sc in same st and in next 5 sts. Working in Rnd below current rnd, work 2-Stitch HDC Cable Stitch. Sc in next st on current rnd. Working in row below, work 4-Stitch HDC Cable Row 1 . Sc in next st of current rnd. Work 2-Stitch Hdc Cable stitch in rnd below . Sc in each of next 6 sts. Sl st to first sc Rnd 9: Repeat Rnd 5 Rnd 10: Ch 1, sc in same st and in next 5 sts. Working in Rnd below current rnd, work 2-Stitch HDC Cable Stitch. Sc in next st on current rnd. Working in row below, work 4-Stitch HDC Cable Row 1 . Sc in next st of current rnd. Work 2-Stitch Hdc Cable stitch in rnd below . Sc in each of next 6 sts. Sl st to first sc Designer Note: Now you will be making each wrister slightly differently depending on whether you are making the right or left hand wrister. Follow instructions carefully so that you don’t end up with 2 the same -2 lefthanded wristers-lol Rnd 11: Thumb Row 1 – Note this rnd is worked differently for left and right wrister so make sure you work instructions to have one of each! Rnd 11 -Left Hand- Ch 1, sc in same st and each st around to last 6 sts. Sc in next st. Ch 5, sk next 3 sts, sc in last 2 sts Sl st to 1st sc. Stitch count: 22 sc + 1 ch 3 Rnd 11 -Right Hand- Ch 1, sc in same st and next st, Ch 5, sk next 3 sts, sc in all remaining sts Sl st to 1st sc. Stitch count: 22 sc + 1 ch 3 Rnd 12: Thumb Row 2- Note: when working on chain 5 section you are making your stitches in the ch sts and not in the ch space! Rnd 12 Left Hand - Ch 1, sc in same st and in next 5 sts. Working in Rnd below current rnd, work 2-Stitch HDC Cable Stitch. Sc in next st on current rnd. Working in row below, work 4-Stitch HDC Cable Row 4 . Sc in next st of current rnd. Work 2-Stitch Hdc Cable stitch in rnd below. Sc in next sc. Sc in each ch st of ch 5. Sc in last two sc. Sl st to first sc Stitch count:27 sts Rnd 12 Right Hand- Ch 1, sc in same st and in next st. Sc in each ch st of ch 5. Sc in next st. Working in Rnd below current rnd, work 2-Stitch HDC Cable Stitch. Sc in next st on current rnd. Working in row below, work 4-Stitch HDC Cable Row 4 . Sc in next st of current rnd. Work 2-Stitch Hdc Cable stitch in rnd below. Sc in each of remaining 6 sts. Sl st to first sc Stitch count: 27 sts Rnd 13: Thumb Row 3 Rnd 13 Left Hand - Ch 1, sc in same st and in each st around to last 8 stitches. Sc in next st. Sc 2tog over next 2 sts. Sc in next st. Sc 2tog over next 2 sts. Sc in last 2 sts. Sl st to first sc Stitch count: 25 sts Rnd 13 Right Hand - Ch 1, sc in same st. Sc 2tog over next 2 sts. Sc in next st. Sc 2tog over next 2 sts. Sc in all remaining sts. Sl st to first sc Stitch count: 25 sts Rnds 14: Ch 1, sc in same st and in next 5 sts for Left Hand Or 9 sts for Right hand Working in Rnd below current rnd, work 2-Stitch HDC Cable Stitch. Sc in next st on current rnd. Working in row below, work 4-Stitch HDC Cable Row 1 . Sc in next st of current rnd. Work 2-Stitch Hdc Cable stitch in rnd below . Sc in each of 9 sts for Left Hand Or 6 sts for Right hand Sl st to first sc Rnd 15: Ch 1, sc in same st and each st around. Sl st to 1st sc. Stitch count: 25 sc Rnd 16: Ch 1, sc in same st and in next 5 sts for Left Hand Or 9 sts for Right hand Working in Rnd below current rnd, work 2-Stitch HDC Cable Stitch. Sc in next st on current rnd. Working in row below, work 4-Stitch HDC Cable Row 2 . Sc in next st of current rnd. Work 2-Stitch Hdc Cable stitch in rnd below . Sc in each of 9 sts for Left Hand Or 6 sts for Right hand Sl st to first sc Rnd 17: Repeat Rnd 15 Rnd 18: Ch 1, sc in same st and in next 5 sts for Left Hand Or 9 sts for Right hand Working in Rnd below current rnd, work 2-Stitch HDC Cable Stitch. Sc in next st on current rnd. Working in row below, work 4-Stitch HDC Cable Row 3 . Sc in next st of current rnd. Work 2-Stitch Hdc Cable stitch in rnd below . Sc in each of 9 sts for Left Hand Or 6 sts for Right hand Sl st to first sc Rnd 19: Repeat Rnd 15 Rnd 20: Ch 1, sc in same st and in next 5 sts for Left Hand Or 9 sts for Right hand Working in Rnd below current rnd, work 2-Stitch HDC Cable Stitch. Sc in next st on current rnd. Working in row below, work 4-Stitch HDC Cable Row 4 . Sc in next st of current rnd. Work 2-Stitch Hdc Cable stitch in rnd below . Sc in each of 9 sts for Left Hand Or 6 sts for Right hand Sl st to first sc Rnd 21: Repeat Rnd 15 Rnd 22- 28/36: Repeat Rnds 14-21 1-2 times more depending on desired finished length. Final Rnd: Ch 1, sc in same st and each st around. Sl st to 1st sc. Stitch count: 25 sc Fasten off and weave in all ends Finishing Finger Edge: Attach new yarn to beginning finger at middle back of wrister- Ch 1, work RSC –(reverse single crochet) around entire edge. Slip st to first sc. Fasten off weave in all ends. Wristers can be worn with or without an additional set of gloves inside them! Enjoy Kay A printable 24 page PDF copy of the complete Cabled Warmers Set (hat, wristers & button cowl or scarf )which includes pictures, charts and additional hint, tips and help is available to purchase for a small fee on this website under Patterns. Looking for more fun free patterns... Check out the Furls Blog Hop https://furlscrochet.com/blogs/crochet-tutorials/furls-blog-hop-2021-52-free-crochet-tunisian-and-knit-patterns and don’t miss the Furls Crochet Foundry Magazine for stunning designs printed quarterly https://crochetfoundry.com/?utm_campaign=crochetfoundrymagazine&utm_source=crochetwithkay-crochetclasses%26crochetspecialprograms&utm_medium=affiliate#oid=1246 This free pattern does contain a couple of affiliate links. By purchasing from these links, I may receive some small commissions. This will not result in any additional costs to you as the commission is paid by the merchant. In this way you support me, and my designing and I will be extremely grateful.
Happy Stitching!
0 Comments
This is so exciting for me ..
I will have one of my original designs highlighted in the Furls patterns blog this Fall! Watch here for the publication date when the pattern will be available to you all as a free download. Have great week everyone! |
AuthorHello everyone and welcome to ... ArchivesCategories |
 RSS Feed